
5250/AS400 Adaptor
Introduction
This
Configuration
Initialization Parameters
This executor must be downloaded:
In the initialization process it is necessary to supply the information to connect to the As400 5250 server. That is the information of the Adapter object.
This executor must be downloaded:

Initialization Parameters
5250 - We are going to fill in the necessary parameters of the adapter.
Adapter: = 5250
Session Name: = Namename that we want to give.
Host: name that we want to give.Host:Port: is the terminal port. -

Proxy Port: name we want to give it. It is optional-

tnEnhanced-: Markedis fora check box. We have the 2option environments.
to check it or not.
Screen Size: we can choose from different options

-
SSL: we can choose from several options
-
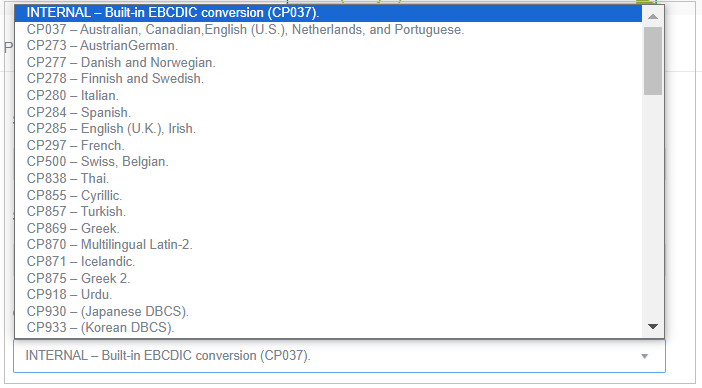
Codepage-: INTERNALwe -have Built-ina EBCDICdrop conversiondown (CP037).For the 2 environments.menu
Predefined Functions
-
clearAndWriteField:
Cleanscleans and writes a text in the indicated field. Parameters:-
Parameter Field: Field number starting with 1
-
Parameter Offset: Offset in the field starting at 1
-
Parameter Value: Text
-
-
clearField:
Clearsclears the field with field number entered in the parameter.
-
containsText(Text):
Thisthis function evaluates if within a host screen, there is a specific text that we define in this function.
1.- In the message mapping, the text we want to find is added in the Value field.
-
getLenghField:
Getsgets the length of the field with field number entered in the parameter.
-
nextScreen:
Thisthis function directly advances to the next navigation screen (you will have previously had to go through it for it to find it).
It does not require parameters in its coding. (Not activated this function at the moment).
-
previusScreen:
Thisthis function directly advances to the previous navigation screen.
It does not require parameters in the encoding. (Function not activated at the moment).
-
readField(Field,Offset,Length):
Thisthis function reads a field that we define in the function parameters:-
Parameter Field: Position (numeric) where the field is located, it is visually counted on the screen, since it is not indicated anywhere.
-
Parameter Offset: By default the value is always 0, which indicates the first position of the field.
-
Parameter Length: Length of the field we are going to read.
-
-
readRow(Row):
Thisthis function reads a particular line on the screen. The whole line.-
Parameter Row: Position (numeric) where the line is located.
This data can be seen at the bottom right of the screen:
-

-
readScreen: This function reads the screen on which you are positioned.
Function without parameters.
-
rowContaintsText(Text,Row): This function checks if a certain text exists on a screen line.
-
Parameter Text: Enter the text to search for.
-
Parameter Row: Position (numeric) of the line.
This data can be seen at the bottom right of the screen.
-
-
waitFor:
Waitwait for the time in seconds received in the parameter to elapse.
-
waitForCursor:
Thisthis function waits for the cursor to appear on the screen we want to see next.-
Parameter timeinSeconds: Value → time to wait until the cursor appears.
-
-
writeAftherLabel (Label, Text):
Thisthis function writes to the screen any text, after the label that we have defined in the Label parameter has been displayed (on the screen).-
Parameter Label: Value → Text to be displayed.
-
Parameter Text: Text that we are going to write.
-
-
writeBeforeLabel (Label, Text):
Thisthis function writes to the screen any text, before the label we have defined in the Label parameter has been displayed (on the screen).-
Parameter Label: Value→ Text to be displayed.
-
Parameter Text: Text that we are going to write.
-
-
writeField (Text, Field, Offset):
Thisthis function writes to a given field the value that we define in the Text parameter.-
Parameter Text: Value→ Text to appear.
-
Parameter Field: Field that we are going to write.
-
Parameter Offset: Position on the field (Position 0).
-
-
writeKey (Key):
Thisthis function executes a predefined key on the screen (ENTER, PF8, PF4, etc…).-
Parameter Key: Value→ Function key.
-
-
writeText (Text, Row, Column):
Thisthis function writes a text at a defined position (line and column).-
Parameter Text: Value→ Text to write.
-
Parameter Row: Value→ Row number.
-
Parameter Column: Value→ Column number.
This data is obtained from the screen, bottom right.
-
Macro generation
As already mentioned in the Introduction, with this adapter you can generate macros that allow you to automate tests in “transformed to HTML” systems. We are going to explain how to record a series of keyboard actions and then execute them.
We connect to the emulator:

Right-click to access the Recording Macro and the Record tab.

We name the file to be recorded and accept. The recording will start.

When we finish and end the recording, we will access again with the right button to the Recording Macro and to the Finish Recording tab.

The file, once the test recording is finished, is saved to: C:\Users\xxxxx\OneDrive\Documentos\5250 where xxxxx will vary depending on the name of each user. Later we will need to find this file to import it.
Next, we access the TAST tool.
-
Check the new diagram box and go to Domain, Project, Folder, Diagram name and Diagram description, as we always do when we design a new diagram. Then the Canvas or blank canvas appears.
-
Access the toolbar and click on the Assistants box.
-
A drop-down menu with different options will appear. The options to choose are:
-
Import from 5250 to 5250.
-
Import from 5250 to HTML.
-
-
We import from Assistants the file that we have recorded and saved in the C: Drive.
-
In either of the two options provided by the Assistants box, a diagram will be automatically generated, which will reflect step by step, the whole recording process of the different actions performed and in which two adapters will appear, the User Object adapter and the 5250 adapter.
-
Save and validate the diagram.
-
And finally, we will take it to the TAST client to execute it.